Introduction to the Post Up Drill
Welcome back to our latest golf instruction session! Today, we're diving into a critical aspect of the golf swing known as the 'post up.' This simple yet effective drill will help you synchronize your hips and arms during the downswing, allowing you to achieve maximum speed, stability, and safety. Let's break it down step by step.
The Importance of the Post Up Movement
The post up in your golf swing is a multi-faceted movement essential for generating power and maintaining control. One of the most common mistakes golfers make during their transition is relying too heavily on their upper body. When you begin your downswing by heaving your shoulders or throwing your arms at the ball, it disrupts the swing plane and leads to inconsistent results.
Understanding the Sequence
It's crucial to understand that the golf swing is all about sequence. Proper sequencing allows you to produce efficient speed. The key is to think of your hips pulling your hands and arms into the downswing. As you transition and make your post up move, your hands and arms should flow seamlessly into the release point.
Executing the Drill
To execute the post up drill effectively, we will focus on isolating the movements to enhance your understanding and feel.
Step 1: Pre-set Your Position
Start by shifting your hips to the left and pulling your hip back and away from the golf ball. This action will open your hips approximately 45 degrees. Ensure your lead leg is passively straight, meaning it shouldn't be rigid but in a neutral joint alignment. This alignment means your hip socket, knee, and ankle are stacked vertically.
Step 2: Engage the Ground
As you make this movement, push against the ground with your lead ankle. This ground force creates upward movement in your lead hip while your club moves downwards. By using this ground force, you enable your hips to rotate and stall, allowing your hands and arms to whip through effortlessly.
Step 3: Maintain Posture
While executing this drill, it's vital to keep your head and chest down. Maintaining your spine angle is crucial for consistency. If you begin to rise up during the swing, you will shift your swing plane, leading to reactive hand movements.
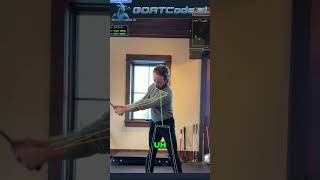
Using the Impact Bag for Feedback
An excellent tool for this drill is the impact bag. This device allows you to check your positions at impact. When you hit the bag, aim for your lead leg to be passively straight, your hips open at 45 degrees, and your shoulders square. If you reach the bag and your posture is incorrect, it indicates that your force of movement originated from your upper body instead of your legs and hips.
Step 4: Practice Slowly
Begin practicing at a slow pace. Start with about 60-70% of your weight on your left foot, with your lead arm parallel to the ground. From this position, push down on the ground and pull your hip back. This motion should allow your hands and arms to drop naturally into the release position. Repeating this about 25 to 50 times will help reinforce the movement.
Step 5: Blend the Movements
Once you feel comfortable with the separate movements, begin to blend them together. You should aim for 25 to 50 reps of this combined movement, ensuring to check your positions consistently. This practice will help you build muscle memory and make the movements feel more natural.
Final Steps for Dynamic Practice
After mastering the static position, transition to a dynamic practice. Start from a static address position, and move through a range of motion until your arms are parallel to the ground (approximately the 9 to 3 position). Continuously check your alignment: is your lead leg straight? Are your hips open? Are your shoulders square? If any of these positions are incorrect, revert to the slow practice until you can achieve the desired positions consistently.
Key Takeaways
- Focus on synchronizing your hips and arms for maximum speed in your swing.
- Use ground force effectively to maintain stability and control in your downswing.
- Practice in a slow, deliberate manner to reinforce the correct movements before increasing speed.
- Utilize an impact bag to check your positions at impact for better feedback.
- Consistency in practice will lead to improved performance on the golf course.
See What GOATY Finds in Your Swing
Upload a swing video and get your GOATScore, root cause diagnosis, and personalized drill prescription in 60 seconds.
Analyze My Swing Freeor
Try a Free Live LessonRelated Articles
Unlock Your Golf Swing: Master the Loading Secret
Discover how to load your golf swing like the GOATs with this essential technique. Improve your game with expert tips an

Master Your Golf Swing: Trail Side Loading & Hand Speed
Learn to load into your trail side and measure hand speed for a powerful golf swing. Unlock peak performance with expert
Master Your Golf Swing: Fix Arms and Load Right
Learn to fix your arms and load properly for a powerful golf swing with expert tips from Chuck Quinton.